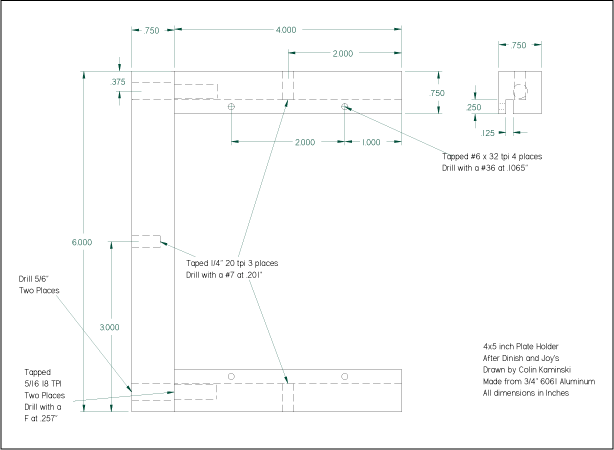
Machined Film holder
A Machined Film Holder
by: Colin Kaminski
4" x 5" Film Holder after Dinish and Joy Padyir's.
This film holder is a copy of one Dinesh and Joy were using when I was there. I made it from 3/4" square aluminum bar. (This is not quite how I made it but I am going to include how I would make it again when I make a second one this week.)
Take a 12" or so section of 3/4" aluminum bar and set a table saw to cut .25" deep. Set the fence .125" from the blade (make sure the fence is parallel to the blade!) Run the piece of aluminum through. (Use two push sticks so you don't get your hands anywhere near the blade. Also a feather board or two would be of use but I did not have any handy.) Then move the fence over about .035 inches or however wide you want the slot. You can make the slot wide enough to accommodate 2 plates and film if you wish.
Then hack saw it to 4.25" or so. (Where the table saw blade exited the part you will notice the slot is wider than the rest of the part. This is because the blade started to ring upon exit and you should make sure to cut off this end.) Set up your cross cut saw on your table saw very square then taking about .030 inches in a pass trim both ends until the ends are clean, square and the piece is exactly 4".
Cut another piece to 6+ inches and clean up the ends on the table saw till it is square and 6" long.
Measure down the 4" pieces 1" from each end and make a line. Measure from the lip .125" and make a line. Where these lines intersect, use a drill press and drill a #36 hole through to the channel. (Marking the hole with a spotting dril is handy to keep the wholde from drifting. At least make sure you have as little of the drill bit sticking out of the chuck as posible and mark the spot with a punch.) Tap to #6 32 tpi. These will be the plate holder screws. (Note: tap from the small side for a reflection plate holder and from the thick side for a transmission holder, or you can make two slots in the same plate holder.)
Mark the two 4" pieces on the ends in the center. (This operation will make the parts "Handed" so make sure to pick opposite ends for this mark.) Drill in a drill press a #F hole about 1/2" deep. Tap to 5/6" 18 tpi.
Measure .375" up and over on the 6" pieces (on the 6" face) and make a mark at each end. Drill through with a 5/16" drill bit. (If you miss this hole or the holes in the ends you can make this hole larger so you can get the parts to align.)
In the center of the bottom of the 4" pieces (away from the slots) drill a #7 hole .425" deep. Tap with a 1/4 20 tpi tap. In the center of the 6" piece, on the same face as the holes, drill a #7 hole .425 or so deep and tap to 1/4" 20 tpi. These will be the mounting holes.
Clean up the corners with a file, and clean up the holes with a countersink tool. Spray paint with Krylon Ultra flat black paint.
Bolt channels to the bas with 2-5/16", 18 tpi, 1" long Allen bolts. Put 4 #6 32 tpi Allen bolts into the channels but first file the ends flat with a 6" mill smooth file. The length should be chosen so it sticks out about .25" when holding a plate. Put 3 1/4", 20 tpi, .75" long Allen set screws into the tapped holes. These now will fit any 1/4" mounting rod.
Spray paint with Krylon Ultra flat black paint. My total time invested was three hours.
A nice touch would be to bevel the front side of the plate holder to 45 deg. You can easily do this with a router and a bearing bit.
What you say? Cut aluminum with wood working tools? The truth is it works very well and I have been doing it for years. It works much better than many woods and it is much faster than milling. I once purchased a 9 HP pin router from Boeing that was used to rout airplane parts. We used it to make electric guitar bodies. If you were going to use your table saw a lot for making aluminum parts I would use a ATB grind 60 tooth blade with large blade stiffeners.
